

 MQL5-Profil öffnen
Trading isn't luck—it's discipline, patience, and risk management.
I analyze global markets with a data-driven approach, focusing on high-probability opportunities across Forex, Commodities, and Stocks.
📊 Market Analysis
📈 Trade Setups
🧠 Risk Management
🌍 Macro Insights
🎯 Consistency Over Hype
Join a community built for traders who value knowledge, discipline, and long-term growth.
The journey to consistent trading starts here.
https://www.mql5.com/en/channels/odysseytrading
Charts & Ideen
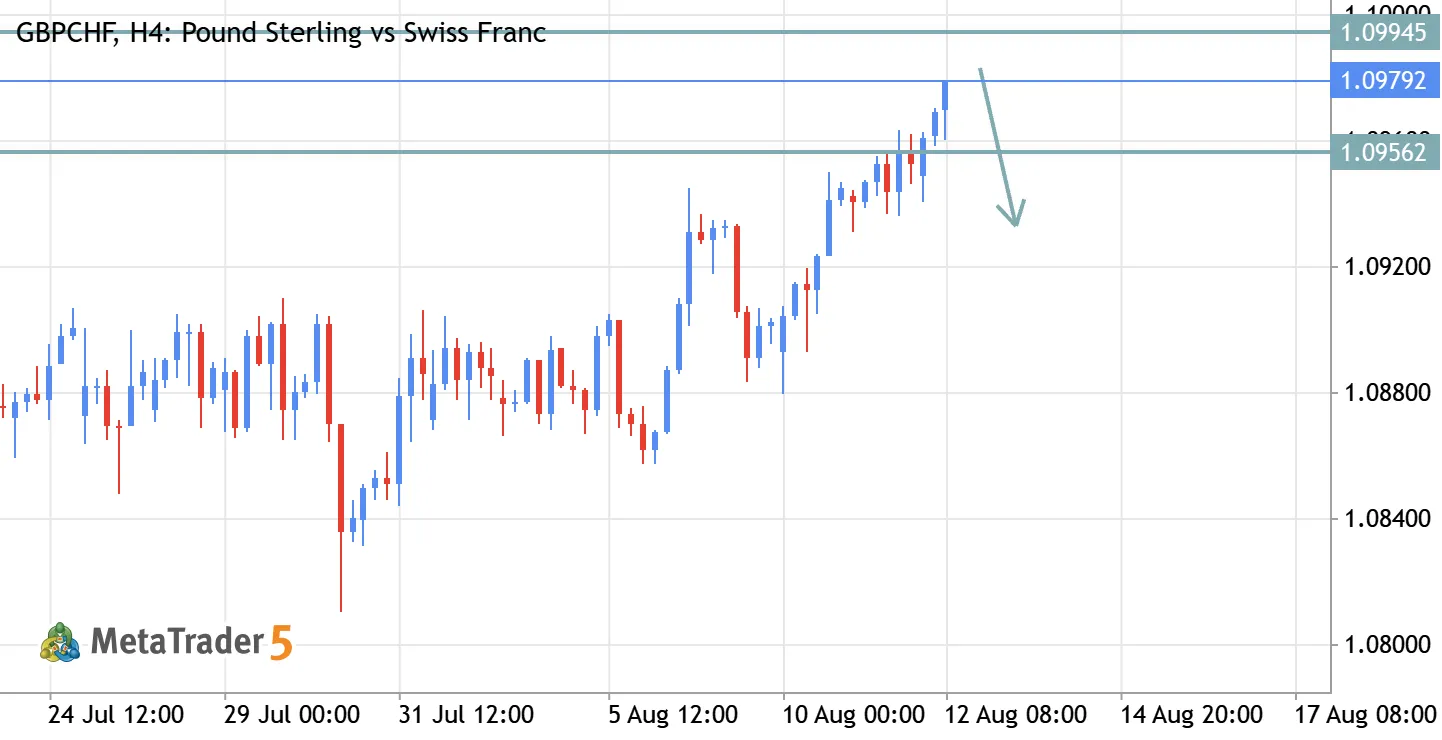
GBP/CHF Sell Setup – Bearish Reversal
🔴 GBP/CHF Sell Signal Sell Zone: 1.09757 – 1.09829
Stop Loss: 1.10000 🎯 Targets:
TP1: 1.09564
TP2: 1.09330 📉 GBP/CHF is approaching a potential resistance zone, presenting a possible selling opportunity. If price rejects the 1.09757–1.09829 zone and bearish momentum develops, the pair could move toward 1.09564, followed by the extended target at 1.09330. Consider securing partial profits at TP1 and allowing the remaining position to run toward TP2 while managing your risk according to your trading plan. Risk Disclaimer: Forex trading involves substantial risk. Always use proper risk management and never risk more than you can afford to lose.
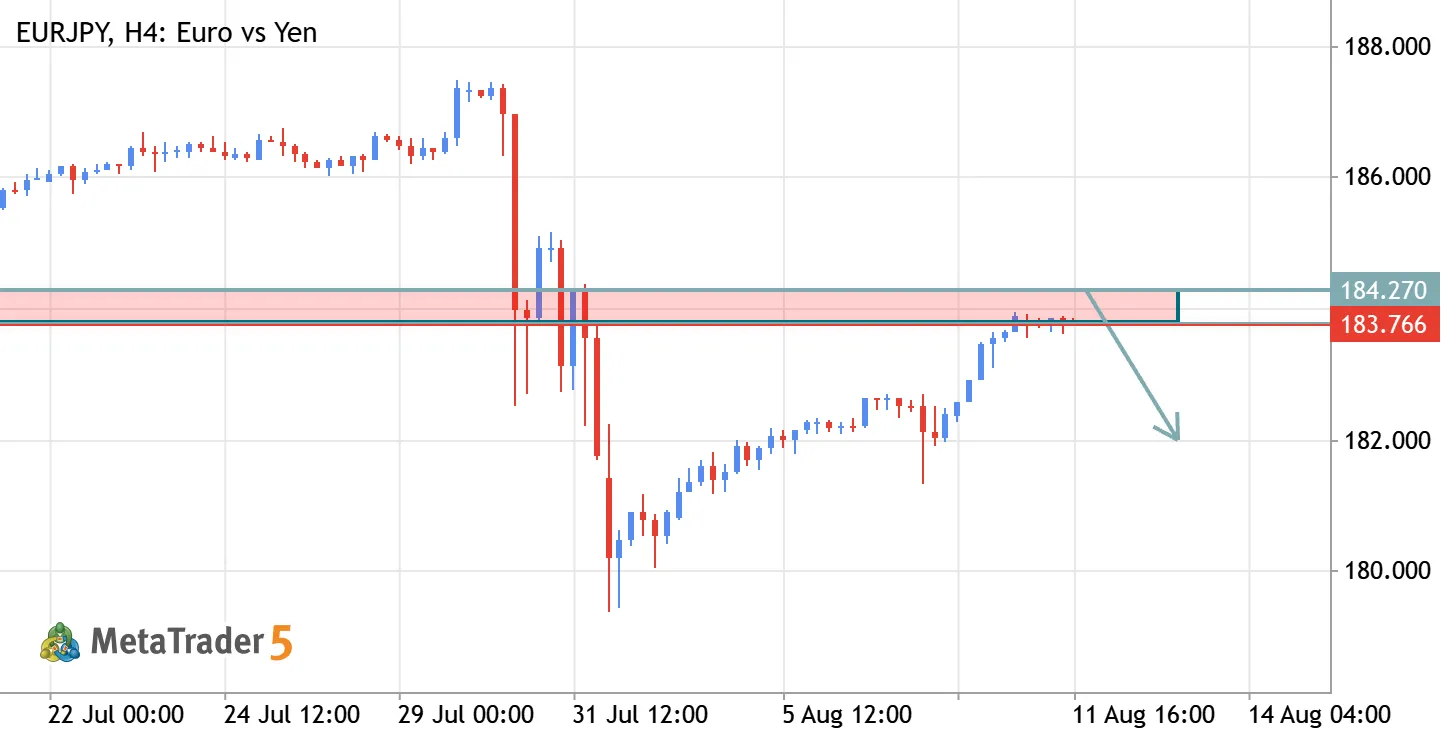
EUR/JPY Sell Setup – Bearish Reversal
🔴 EUR/JPY Sell Signal Sell Zone: 183.850 – 184.270
Stop Loss: 184.800 🎯 Targets:
TP1: 182.000
TP2: 182.000 📉 EUR/JPY is approaching a potential resistance zone, presenting a possible swing selling opportunity. If price rejects the 183.850–184.270 zone and bearish momentum develops, the pair could move toward the 182.000 target. Note: You provided the same level (182.000) for both TP1 and TP2, so I’ve kept it exactly as given. Risk Disclaimer: Forex trading involves substantial risk. Always use proper risk management and never risk more than you can afford to lose.
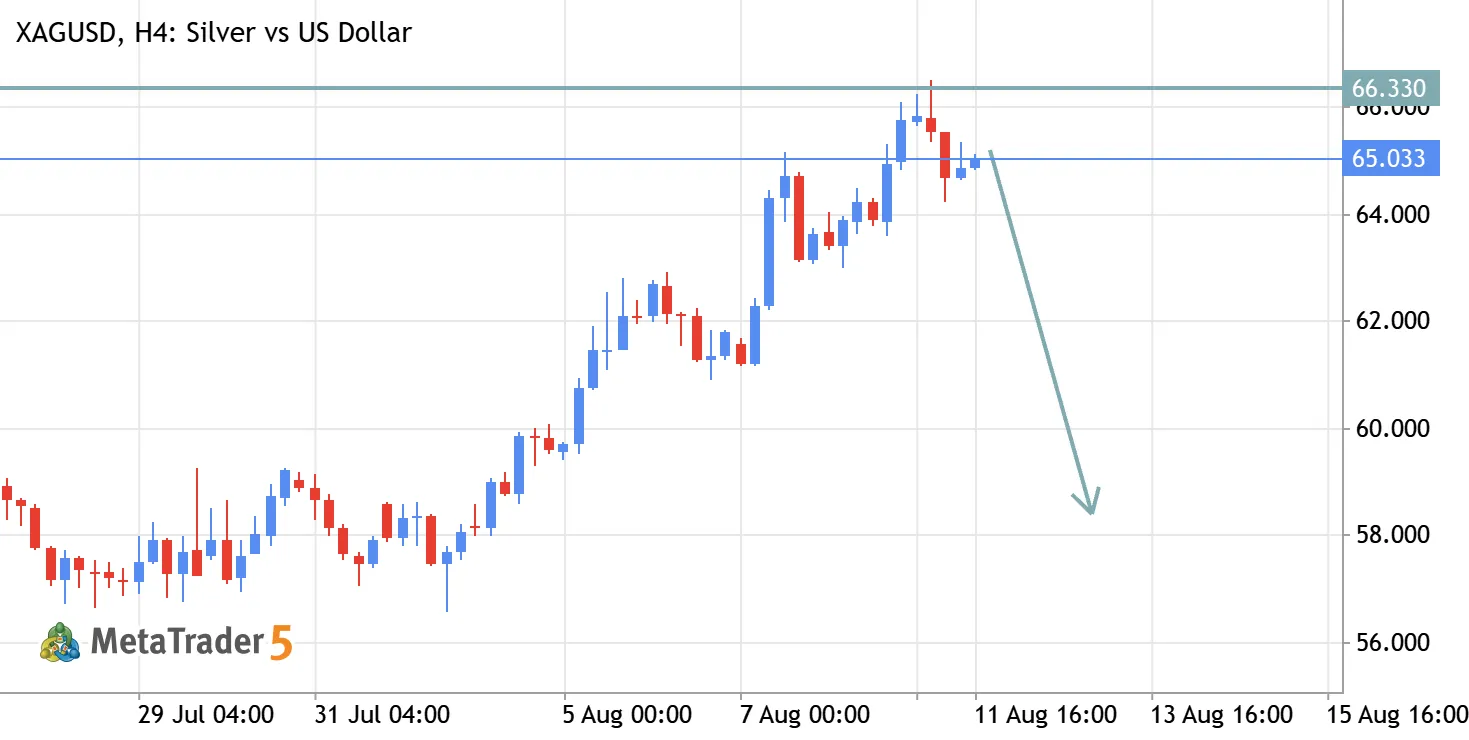
XAG/USD (Silver) Long-Term Swing Sell
🔴 XAG/USD Sell Signal
Sell Zone: 65.000 – 65.180
Stop Loss: 66.140
Targets: 64.000 - 61.430 - 58.400 (Open)
📉 Silver is approaching a major resistance zone, presenting a potential long-term swing selling opportunity. If price rejects the 65.000–65.180 zone and bearish momentum develops, Silver could move toward 64.000, followed by 61.430 and the deeper target at 58.400.
As this is a swing-trade setup, patience and disciplined risk management are important. Consider securing partial profits at each target while allowing the remaining position to run if bearish momentum continues beyond 58.400.
Risk Disclaimer: Trading commodities involves substantial risk. Always use proper risk management and never risk more than you can afford to lose.-
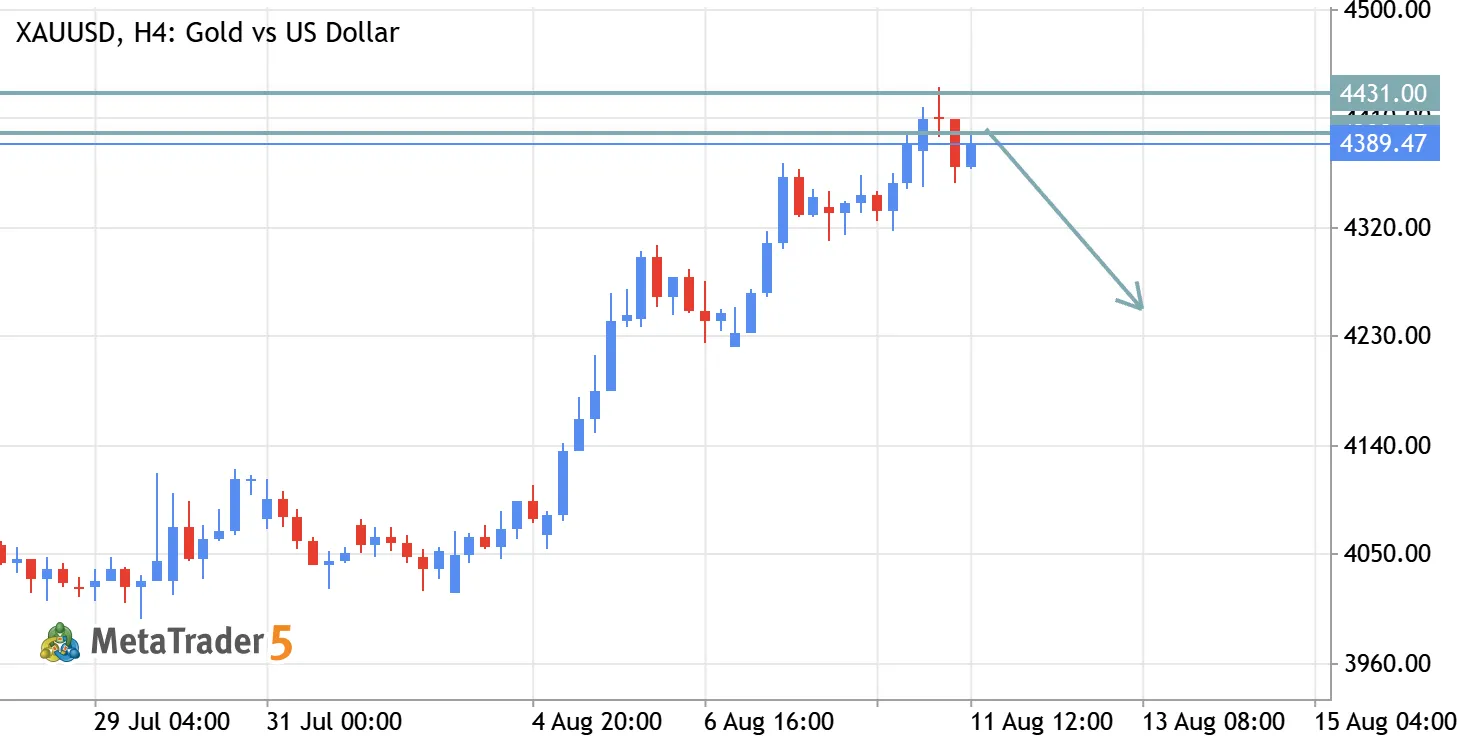
XAU/USD (Gold) Long-Term Swing Sell – Major Resistance
🔴 XAU/USD Sell Signal Sell Zone: 4398 – 4410
Stop Loss: 4430 Targets: 4388 - 4370 - 4350 (Open) It's swing trade last target is 4250 if market act as price action. 📉 Gold is approaching a major resistance zone, offering a potential long-term swing selling opportunity. If price rejects the 4398–4410 zone and bearish momentum develops, Gold could move toward 4388, followed by 4370 and 4350. As this is a swing-trade setup, patience is important. Consider securing partial profits at each target while allowing the remaining position to run if bearish momentum continues beyond 4350. Always manage risk carefully and avoid overexposure. Risk Disclaimer: Trading forex and commodities involves substantial risk. Always use proper risk management and never risk more than you can afford to lose.
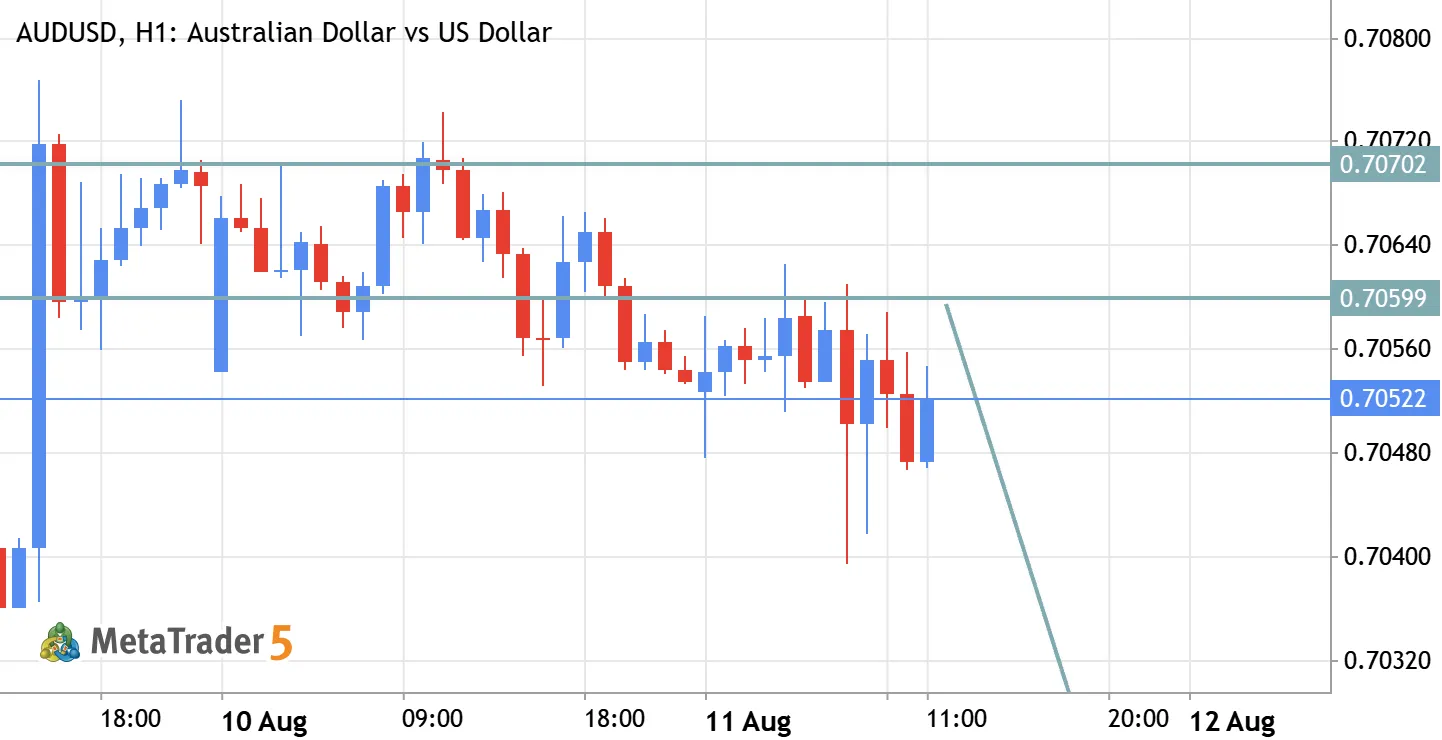
AUD/USD Sell Setup – Bearish Reversal
🔴 AUD/USD Sell Signal Entry Zone: 0.70530 – 0.70413
Stop Loss: 0.70800 🎯 Targets:
TP1: 0.70413
TP2: 0.70200 📉 AUD/USD is approaching a potential resistance area, presenting a possible selling opportunity. If price rejects the entry zone and bearish momentum develops, the pair could move toward 0.70413, followed by the extended target at 0.70200. Consider securing partial profits at TP1 and allowing the remaining position to run toward TP2 while managing your risk according to your trading plan. Risk Disclaimer: Forex trading involves substantial risk. Always use proper risk management and never risk more than you can afford to lose.
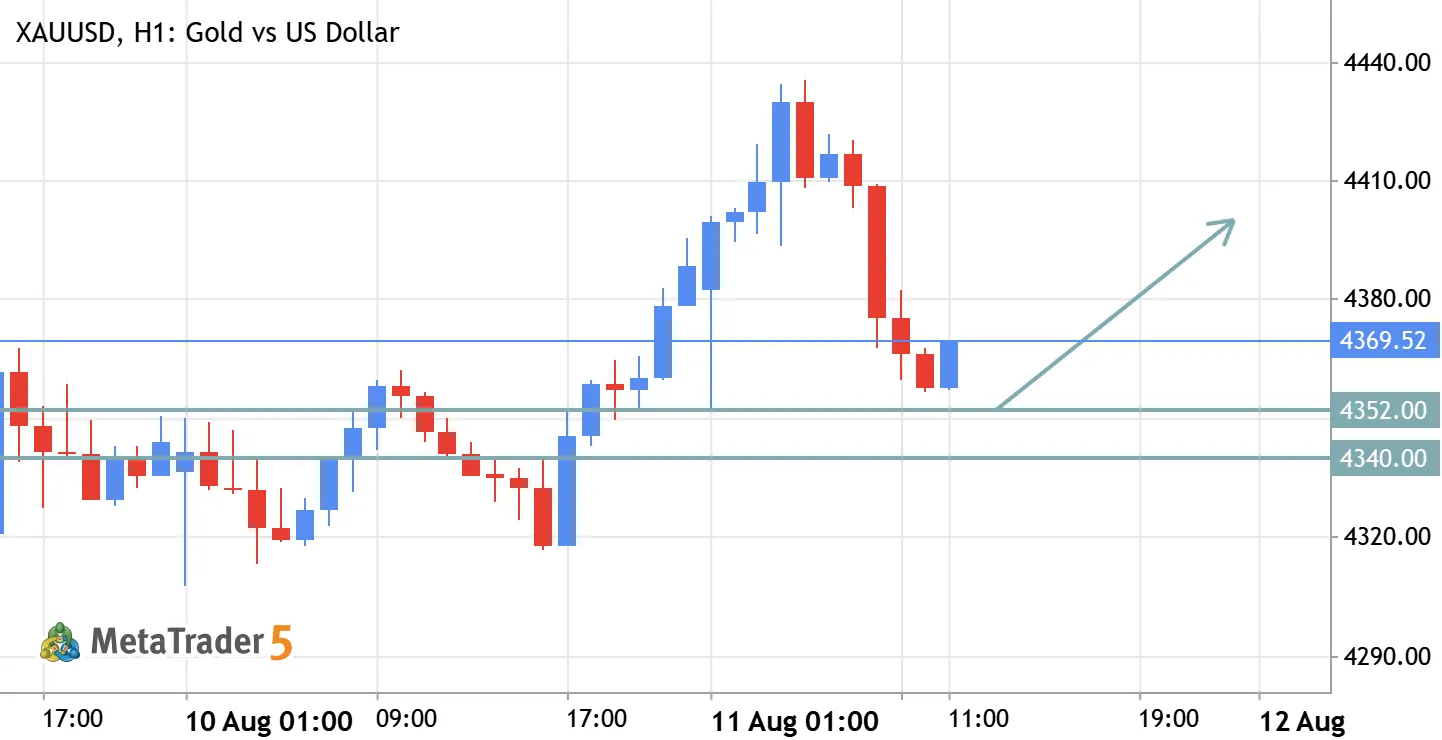
XAU/USD (Gold) Buy Setup – Bullish Continuation
🟢 XAU/USD Buy Signal
Buy Zone: 4352 – 4340 Stop Loss: 4325
TP: 4360 - 4375 - 4400 (Open)
📈 Gold is maintaining a bullish structure, and the 4352–4340 zone could provide a favorable opportunity to buy a pullback. If price holds the buy zone and shows bullish confirmation, Gold may continue higher toward 4360, 4375 and 4400.
If bullish momentum remains strong above 4400, the trade can remain open for further upside. Consider securing partial profits at each target and protecting the position as price moves in your favor.
Risk Disclaimer: Trading forex and commodities involves substantial risk. Always use proper risk management and never risk more than you can afford to lose.
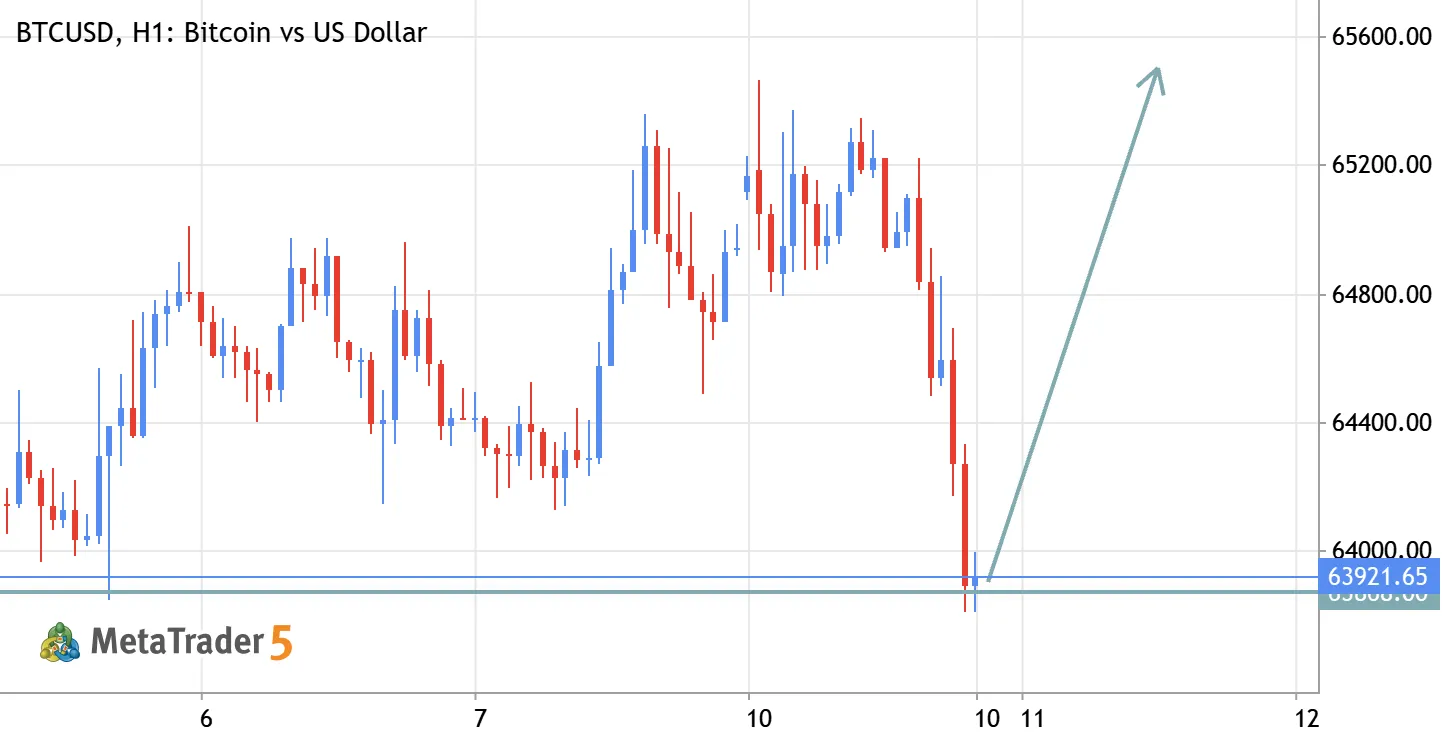
BTC/USDT Long Setup – Bullish Momentum
🟢 BTC/USDT LONG Signal Entry Zone Limits: 63,800 – 63,900
Stop Loss: 63,650 🎯Targets: 64,300 - 64,700 - 65,100 - 65,500 📈 BTC/USDT is presenting a potential bullish setup from the 63,800–63,900 entry zone. If Bitcoin holds the entry area and bullish momentum continues, price could move progressively toward 64,300, 64,700, 65,100 and ultimately 65,500. Consider securing partial profits at each target and protecting the position as price moves in your favor. With 100x leverage, risk management is extremely important—even a small adverse move can result in significant losses. ⚠️ Risk Disclaimer: Leveraged cryptocurrency trading carries a very high level of risk. Never risk more than you can afford to lose and use appropriate position sizing.
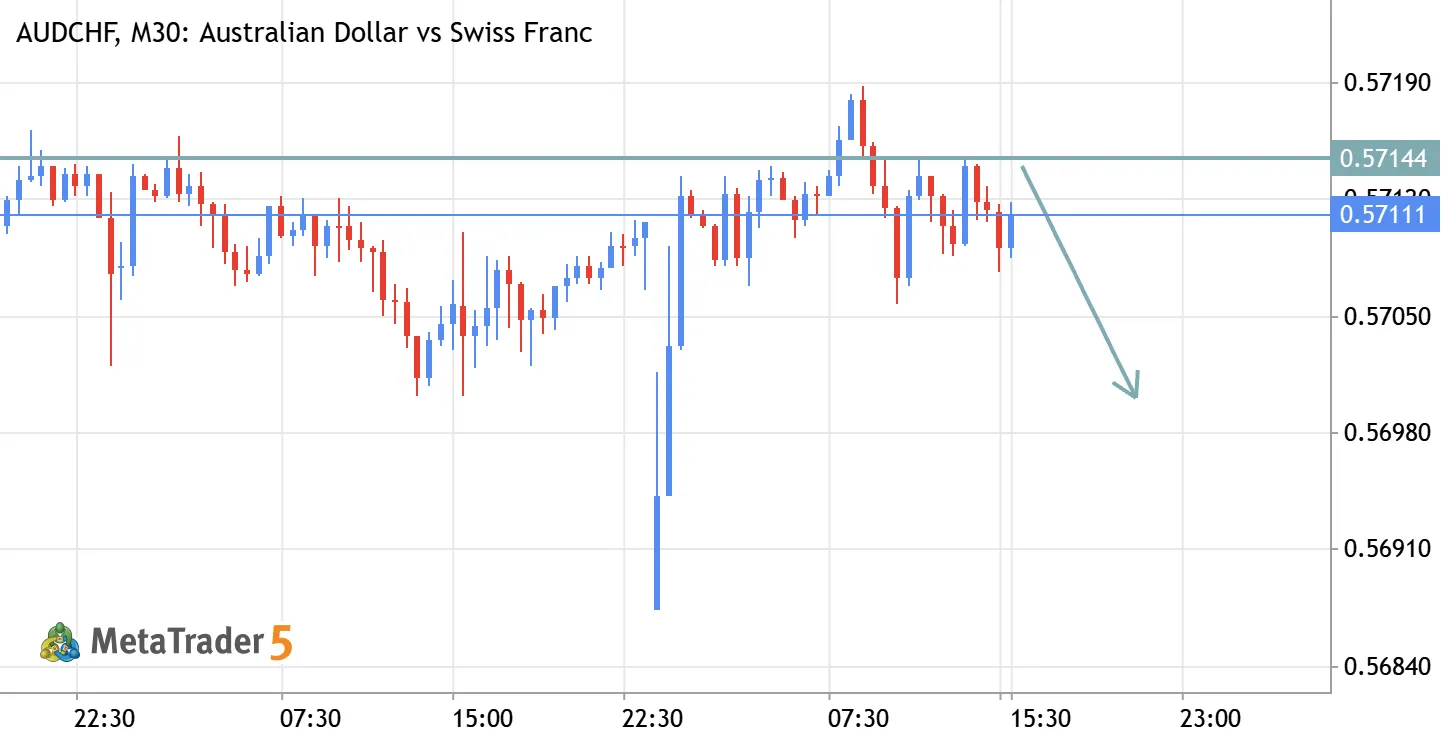
AUDCHF Sell Setup – Quick Bearish Move
🔴 AUD/CHF Sell Signal Entry: 0.57140
Stop Loss: 0.57160
Take Profit: 0.57000 📉 AUD/CHF is showing a potential bearish setup with a tight risk level. If price rejects the entry area and bearish momentum continues, the pair could move toward the 0.57000 target. Manage your position carefully due to the tight stop loss and follow proper risk management. Risk Disclaimer: Forex trading involves substantial risk. Always use proper risk management and never risk more than you can afford to lose.
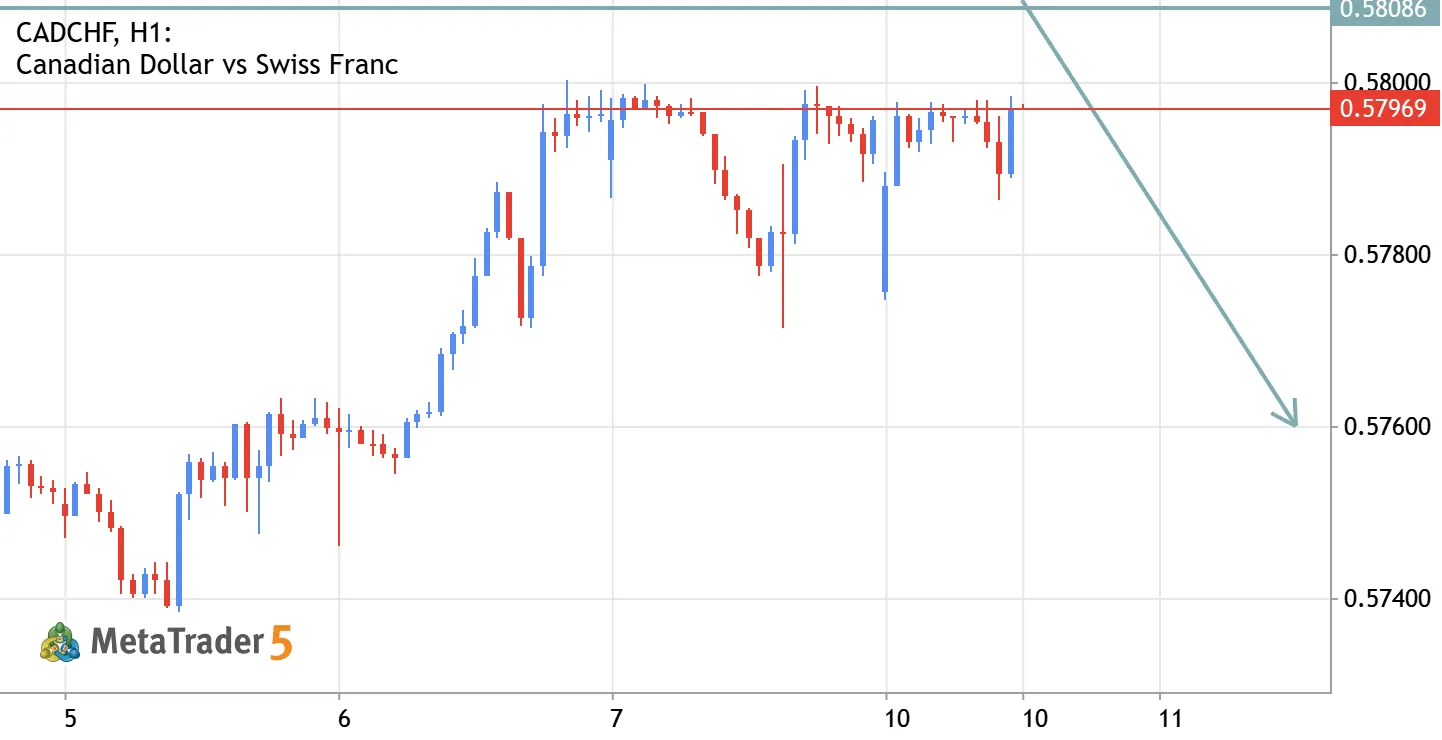
CAD/CHF Sell Setup – Resistance Rejection Opportunity
🔴 CAD/CHF Sell Signal Entry Zone: 0.58000 – 0.58095
Stop Loss: 0.58300
Take Profit 1: 0.57760
Take Profit 2: 0.57600 📉 CAD/CHF is approaching a potential resistance zone, presenting a selling opportunity. The first target is 0.57760, while the extended target is 0.57600. Consider securing partial profits at TP1 and allowing the remaining position to run toward TP2 while managing risk according to your trading plan. Risk Disclaimer: Forex trading involves substantial risk. Always use proper risk management and never risk more than you can afford to lose.
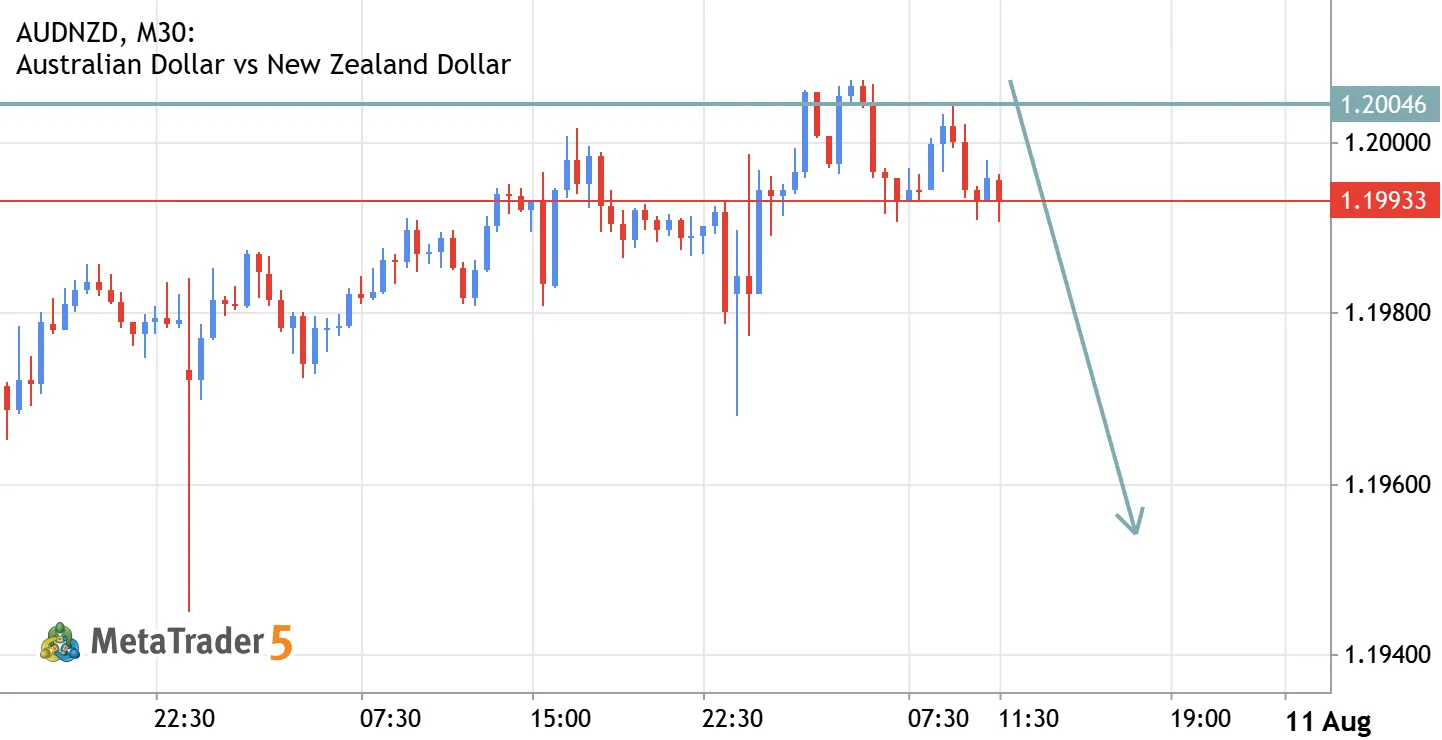
AUD/NZD Sell Setup – Bearish Momentum Reversal
🔴 AUD/NZD Sell Signal Entry Zone: 1.19971 – 1.20072
Stop Loss: 1.20320
Take Profit 1: 1.19780
Take Profit 2: 1.19540 📉 AUD/NZD is showing signs of potential bearish momentum from the current resistance area. A rejection from the entry zone could open the way toward 1.19780, followed by the extended target at 1.19540. Consider securing partial profits at TP1 and allowing the remaining position to run toward TP2 while managing risk according to your trading plan. Risk Disclaimer: Forex trading involves substantial risk. Always use proper risk management and never risk more than you can afford to lose.
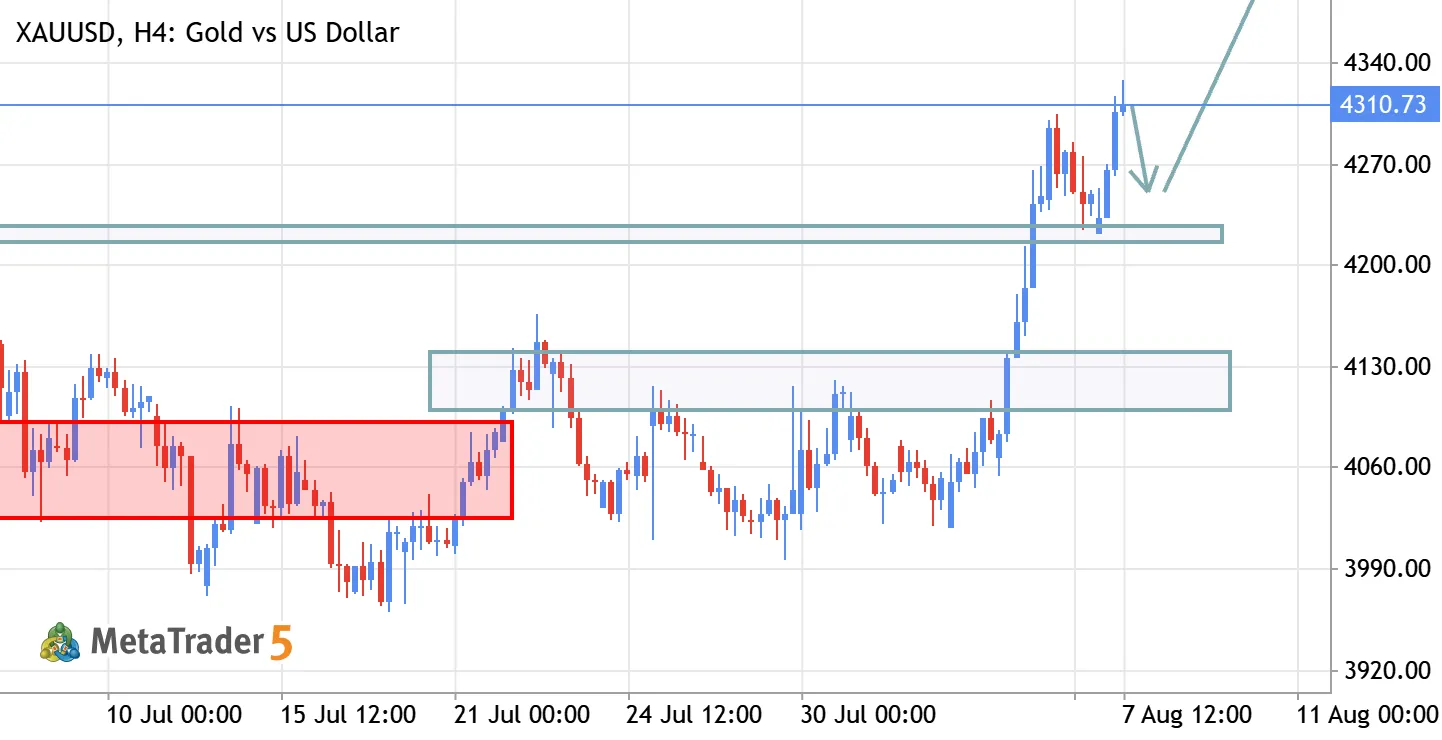
XAU/USD (Gold) Buy Setup – Buy the Dip Opportunity
Timeframe: H4 As I previous mentioned areas that moved as it continue rally moved to targeting swing 4400 - 4435. Gold remains in a strong bullish trend after breaking out of its previous consolidation range. The current price action suggests a healthy pullback toward the key support zone around 4,225, where buyers may step in before the next bullish leg begins. A successful hold above the support zone could provide an excellent buying opportunity, with the potential for Gold to resume its uptrend. The primary upside target is the 4,400–4,435 target zone. If bullish momentum remains strong, further gains beyond this area are possible. 📈 Trade Idea: Bias: Buy Key Support: 4,225 Target Zone: 4350 - 4475 - 4400 – 44435 Strategy: Wait for bullish confirmation near the support zone before
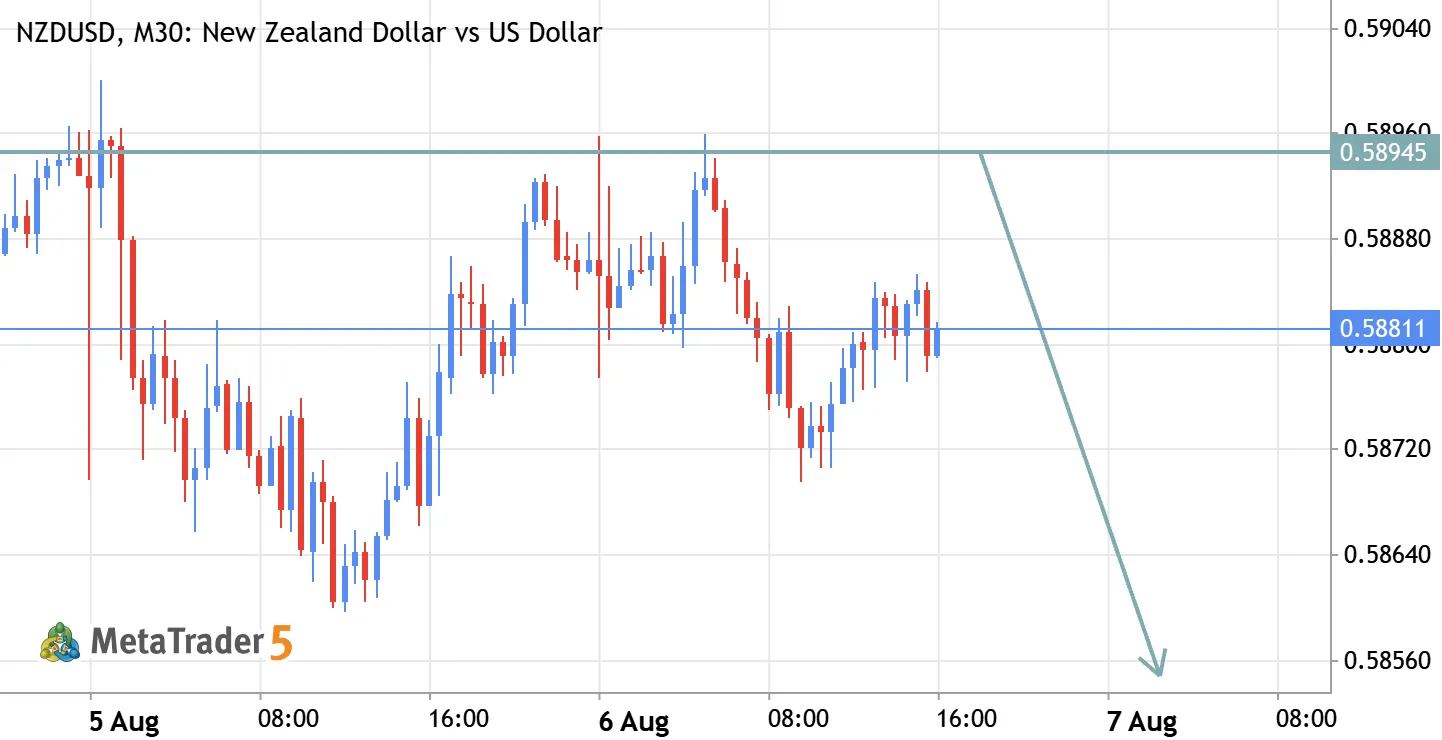
NZD/USD Reversal Alert – Sell Setup You Don't Want to Miss!
NZD/USD Sell Signal Entry : 0.58548 - 0.58945 Stop Loss: 0.59132 Take Profit 1: 0.58697 Take Profit 2: 0.58548 📉 NZD/USD is approaching a key resistance zone, presenting a potential high-probability selling opportunity. The first target is set at 0.58697, with an extended target of 0.58548. If bearish momentum continues to strengthen, the pair could extend its decline toward the final target. Trade Management: If the second entry at 0.58945 is activated and price retraces to Entry 1 (0.58548), close the first position and move the second position's stop loss to breakeven (B.E.). This strategy helps protect profits while allowing the remaining position to continue toward the final target. Risk Disclaimer: Forex trading involves substantial risk. Always use proper risk management and never